Connect to BMT Controller
Contents
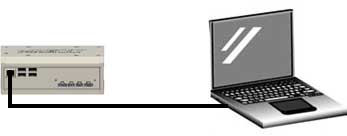
Connect directly to PC using LAN-cable
The easiest and direct way to start with the controller is by connecting it using a LAN cable directly with a PC.
Connect to Network
It is possible to connect one or more controller within a network. The BMT Controller will use an IP-address given by the DHCP server of your network. It is also possible to configure a fixed IP address for the controller (more details in chapter: “Network Connection Settings”).
Connect to W-LAN
Connecting the BMT Controller to W-LAN is possible using the Client Software when the Controller is already connected using LAN-cable and a Client PC, directly on the BMT controller using a monitor and a keyboard + mouse, or using a configuration file on an USB-Stick.
The BMT Controller will use an IP-address given by the DHCP server of your network. It is also possible to configure a fixed IP address for the controller (more details in chapter: “Network Connection Settings”).
Connect to W-LAN using Client-Software
To be able to change the W-LAN settings using the software, the controller needs to be connected to PC already (with cable) or the settings change must be done using the controller itself with monitor and keyboard + mouse.
PC-software: Selecting the controller in the BMT Controller list will show the controller details in the details section.
Directly at the controller: The sub-menu item Controller -Details.
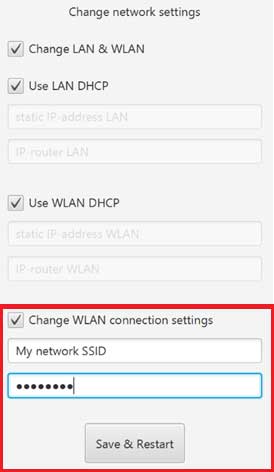
Select “Change LAN & WLAN” and select “Network Connection Settings”
Enter the SSID in the first field.
Add the password in the second field.
After clicking “Save & Restart” the BMT Controller is restarting and should connect to WLAN.
Connect to W-LAN using USB-Stick
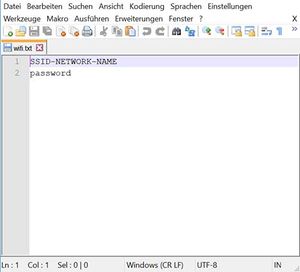
Make a file named “wifi.txt” and add the W-LAN SSID in the first line and the password in the second line. Insert the USB-Stick into the BMT Controller. This can be done while the Controller is running or also before the boot process. Now the settings will be set and the software on the BMT Controller is restarting. This process may take up to a minute.
Adding BMT Controller in the Software
Automatic using UPD
The BMT Controller periodically sends its details using UPD. This information is automatically received from the Client Software which automatically establishes a connection to the controller.
If the BMT Controller is not registered automatically, the network connection settings and the physical network connection should be checked.
It is also possible to connect the controller manually as described in the next section.
More information and actions for problems with the automatic connection can be found in the Troubleshooting chapter.
Adding Manually
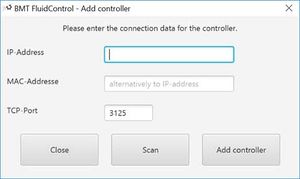
Using the “New controller” button at the bottom of the BMT Controller list allows to establish a connection to a controller manually.
This window allows to establish the connection to a BMT controller in several ways.
| Scan | Using the “Scan” button the software scans network for a BMT Controller using the TCP-Port address. Please note this operation may take several minutes. |
| IP-Address | Entering the IP-Address and clicking the button “Add controller” will try to establish a connection to a controller using the IP-Address and the TCP-Port. This may take several seconds.
If the BMT Controller is connected directly to the PC, it should be possible to connect to the controller using the Direct-IP as written on the controller label placed at the bottom of the controller. |
| MAC-Address | Entering the MAC-Address and clicking the button “Add controller” will try to establish a connection to a controller using the MAC-Address and the TCP-Port. The IP-Address needs to be left blank for the operation. This may take several seconds.
If the BMT Controller is connected directly to the PC, it should be possible to connect to the controller using the Mac as written on the controller label placed at the bottom of the controller. |
More information and actions for problems with the manual connection can be found in the “Troubleshooting” chapter.


